PHP in Nginx + PHP-FPM Mode: Configuration and Features
FastCGI (Nginx + PHP-FPM) mode is the most efficient PHP operating mode commonly used for optimizing and speeding up websites.
However, when transitioning a website to PHP-FPM, additional configurations are required:
- Rules specified in .htaccess will no longer apply. You will need to move similar directives to the Nginx configuration file. To simplify this process, you can use online services that convert .htaccess directives for Nginx.
- If you are using a CMS, you will also need to make changes to the configuration file. Below, we provide settings for CMS like WordPress, Joomla, Opencart, and Bitrix.
Translating a Site to PHP-FPM
Below are the steps to follow when moving a site to PHP-FPM. It is assumed that Nginx is already installed. If not, follow these steps:
- In the Settings section, select Web server and click Edit.
- Ensure that Nginx and PHP-FPM FastCGI are selected.
- Save the changes and wait for the installation to complete.
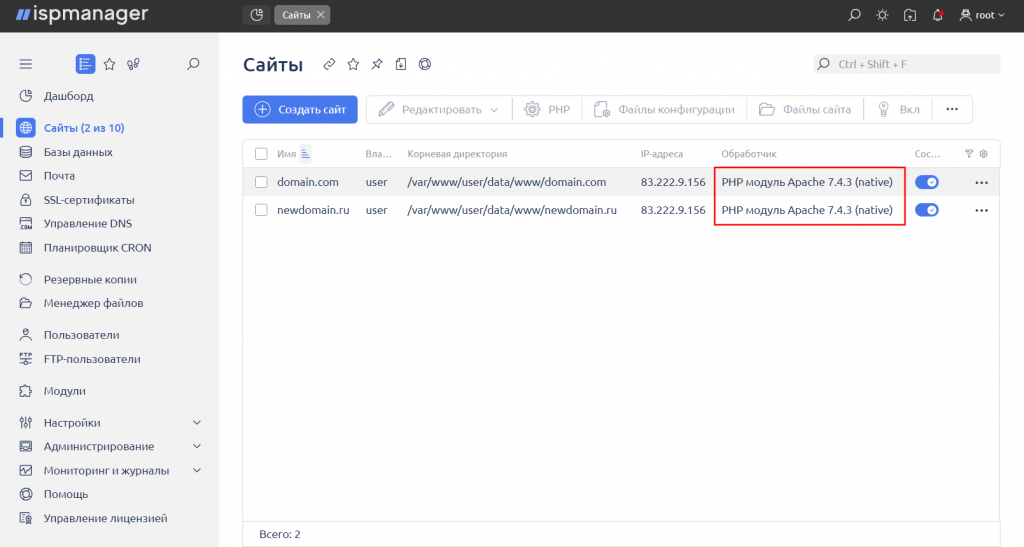
- First, determine the current PHP version and PHP operating mode your website is using. You can find this information in the Sites section if you are logged in as root:

- Go to the Users section, select the relevant user, and click Edit.
- On the Access tab, check the box for Can use PHP in FastCGI (Nginx + PHP-FPM).
- Go to the Sites section:
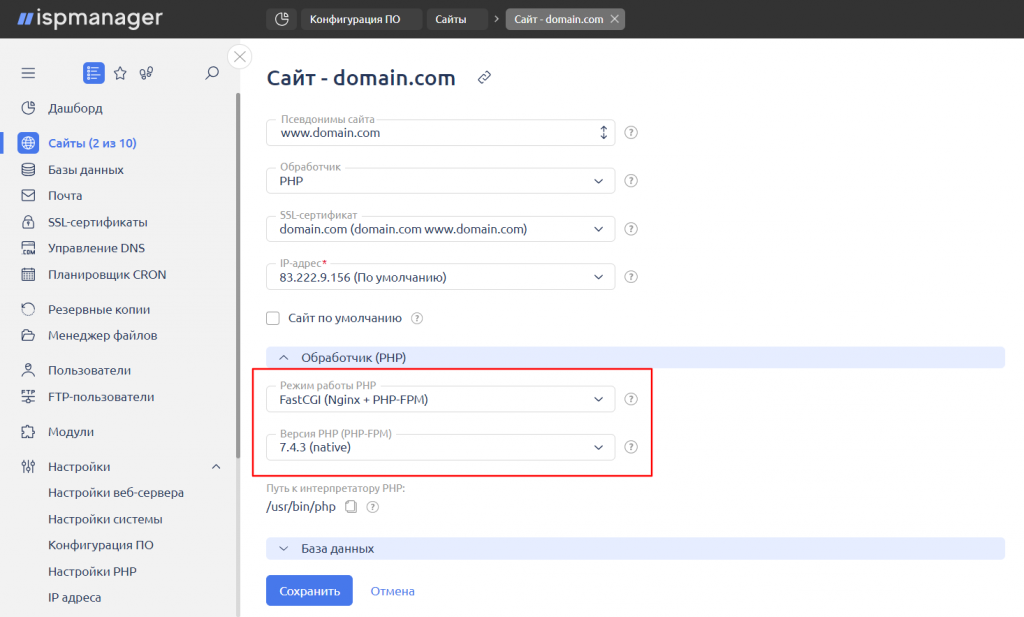
- Double-click on the site you need.
- In the PHP Handler tab, select FastCGI (Nginx + PHP-FPM).
- Specify the PHP version that your site is currently using (see step 1).

- Test the functionality of your site's pages. Typically, most pages, except the homepage, may return a 404 error. In this case, you will need to make additional configurations, including redirect settings.
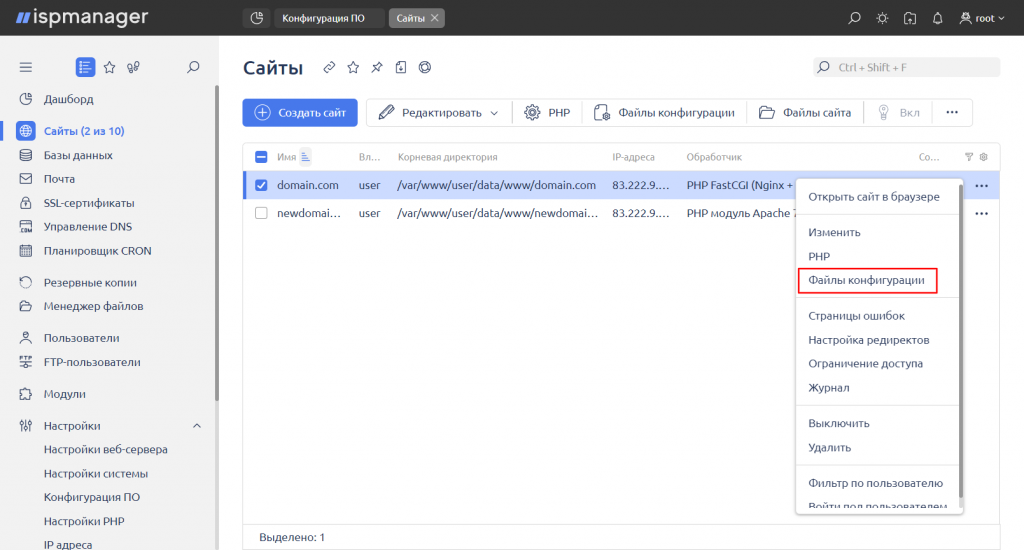
- Go to the Sites section, select the row with the corresponding domain, and click on the three dots to open additional options. Then select Configuration files.

- Make the necessary changes to the configuration file according to the CMS you are using, following the instructions below:
WordPress, Joomla
In the configuration file, find the block starting with the line:
location / {Immediately after this line, add the following redirect:
try_files $uri $uri/ /index.php?q=$uri&$args;Opencart
In the configuration file, find the block starting with the line:
location / {Immediately after this line, add the following redirect:
- Double-click on the site you need.
- In the PHP Handler tab, select the FastCGI (Nginx + PHP-FPM) operating mode.
- Specify the PHP version currently in use on the site (see step 1).
- Test the functionality of your site's pages. Typically, most pages, except the homepage, may return a 404 error. In this case, you will need to make additional configurations, including redirect settings.
- Go to the Sites section, select the row with the corresponding domain, and click on the three dots to open additional options. Then select Configuration files.
- Make the necessary changes to the configuration file according to the CMS you are using, following the instructions below:
WordPress, Joomla
In the configuration file, find the block starting with the line:
location / {Immediately after this line, add the following redirect:
try_files $uri $uri/ /index.php?q=$uri&$args;Opencart
In the configuration file, find the block starting with the line:
location / {Immediately after this line, add the following redirect:
if (!-e $request_filename){
rewrite ^/(.+)$ /index.php?_route_=$1 last;
}
Keep in mind that when using SSL, there will be two location blocks in the file, and you need to add the redirect to both blocks.
Bitrix
In the configuration file, find the following block:
location @php {Below this block (not below this line), insert the block with the redirect:
location ~* /\.ht {
deny all;
}

location ~ ^/(?!(\.well-known)) {
if !-e $request_filename) {
rewrite ^(.*)$ /bitrix/urlrewrite.php last;
}
}

if (!-f $request_filename) {
rewrite ^(.*)/index.php$ $1/ redirect;
}- Save the changes and check the functionality of your site.

