How to set up email settings on virtual hosting in Mozilla Thunderbird
By default, email on virtual hosting only works through a browser. In this article, we will explain how to set up a connection to the Mozilla Thunderbird email client.
If you haven't installed an email client on your computer yet, you can download it from the Thunderbird website.
Step 1: Creating a New Account

Run the email client and select "Email" in the pop-up window.
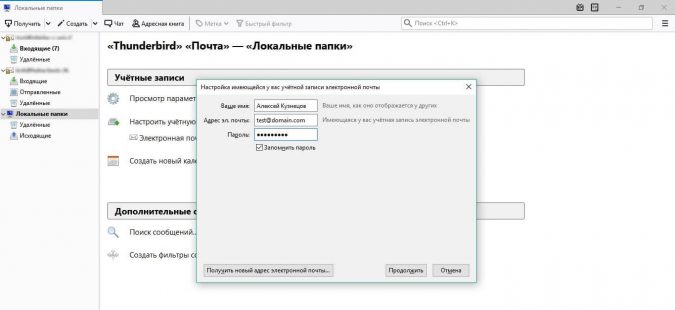
A window with the main data of the mail account will appear.
Fill in the fields "Email address" and "Password" with the data from your mail account created in cPanel. If you haven't created an account yet, you can use the instructions for creating a mailbox in cPanel.
Click "Continue", then check the entered login and password. For security, our system blocks the IP address after 20 incorrect attempts to log in to the account, in case an attacker tries to guess the password.
Make sure you have entered the login details correctly and that there are no typos or extra spaces. If your IP address is still blocked, contact support so that we can perform a check and remove the block.
Step 2: Mail Settings
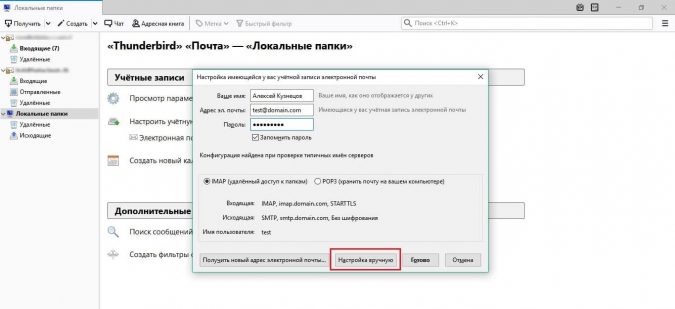
After you click "Continue", additional settings parameters will appear in the same window. Find and select the "Manual Config" button:
Then fill in the fields with the mail parameters:
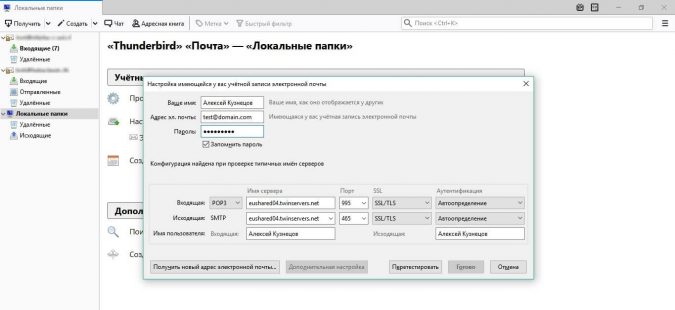
Protocol: If you choose POP, your emails will be saved on your computer. You will be able to read them even without internet access, but the correspondence will only be available on one computer.
If you choose IMAP, your emails will be saved on our server. You will be able to access the mailbox from different devices such as a computer, smartphone, or tablet. This is convenient if multiple people need access to the mail or if you do not always have access to the main computer.
Server Name: Enter the server name on which your site is located. You can find it in the email we sent you after purchasing hosting. The subject of the email should be "Your virtual hosting is ready to use." The server name should look something like this: uashared12.twinservers.net.
If you cannot find the email in your inbox, log in to cPanel and find the server name in the browser's address bar.
By default, the server name will have the following format: mail.domain.com. However, we do not recommend using this option because:
- For this setting, you need to create an A record and MX record for the subdomain mail. If the server's IP address changes in the future, the mail will stop working;
- You need to install an SSL certificate on the mail subdomain. If there is no SSL certificate, sending emails will be insecure: attackers can intercept and read them.
Port: If you have chosen IMAP as the protocol for incoming mail, specify port 993. If you have chosen POP3, specify port 995. For outgoing mail, specify port 465.
Username: Fill in this field with your name. When others receive emails from you, they will see this name in the "From" field.
After filling in all the fields, click "Done." Then click "Get" to copy all old emails to the email client.
Step 3: Send a test email
To test the settings, send a test email to another mailbox or to a familiar email address.
If your email goes to Gmail spam
Gmail has fairly aggressive spam filters, so emails from new addresses may end up in spam. If this happens, read the instructions on setting up Gmail filters and create a new filter for the address from which you sent the email.
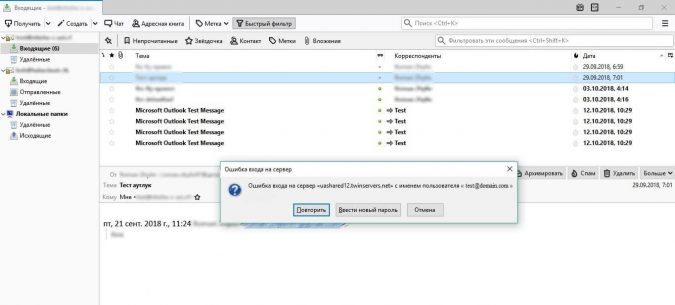
If you encounter an "Login to server failed" error
This error indicates that the email client cannot connect to the server. This can happen if you entered the wrong email password or are using a VPN.
Try disabling VPN or re-entering the password and clicking "Retry." If the error persists, contact support.
Additional settings
If you want to configure management, settings, and add-ons for the email client, use the instructions for advanced Thunderbird settings.

