

Installing Laravel in Fastpanel
Laravel is one of the most popular PHP frameworks. This guide explains how to deploy a new Laravel project on a server running Fastpanel: prepare the panel, create a website, install the framework with Composer, connect a database and, optionally, Memcached.
The examples use the domain example.com and the site owner user — replace them with your own values.
Server preparation
Installing Composer
Laravel is installed using the Composer dependency manager. If it is not installed yet:
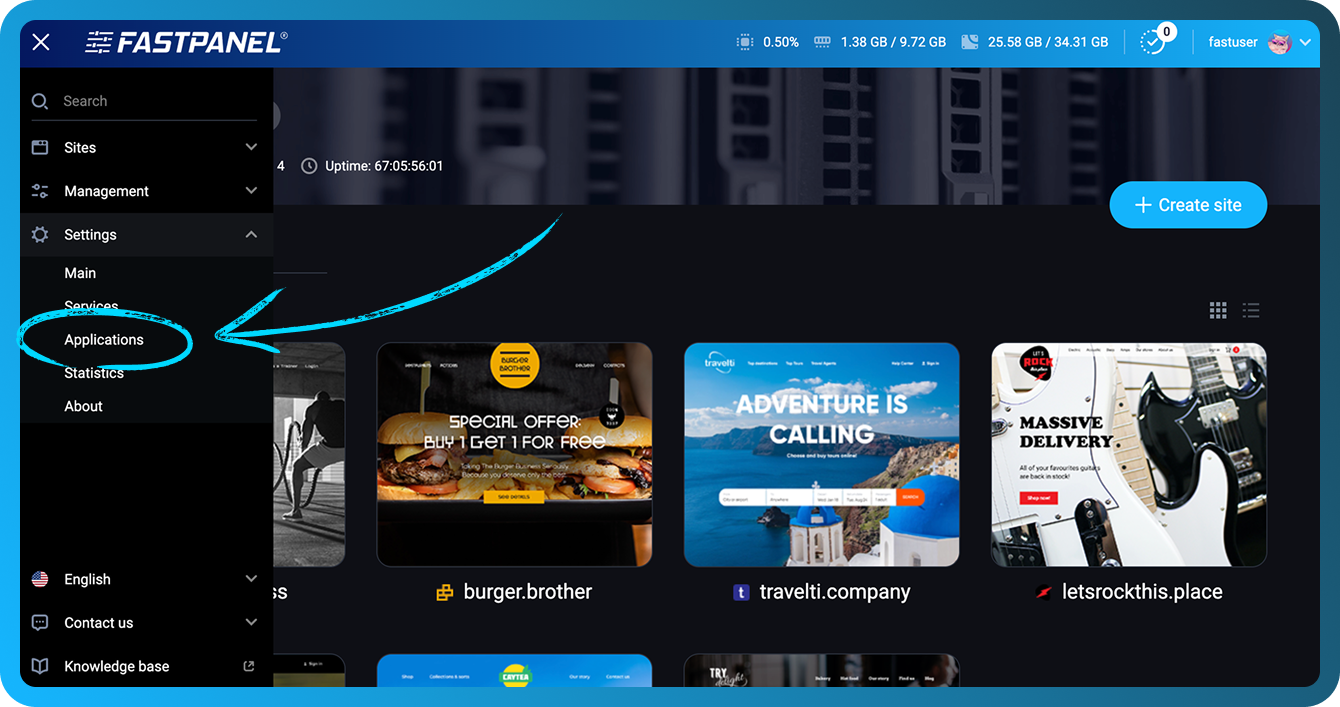
- Log in to Fastpanel, open the side menu and select Settings → Applications.
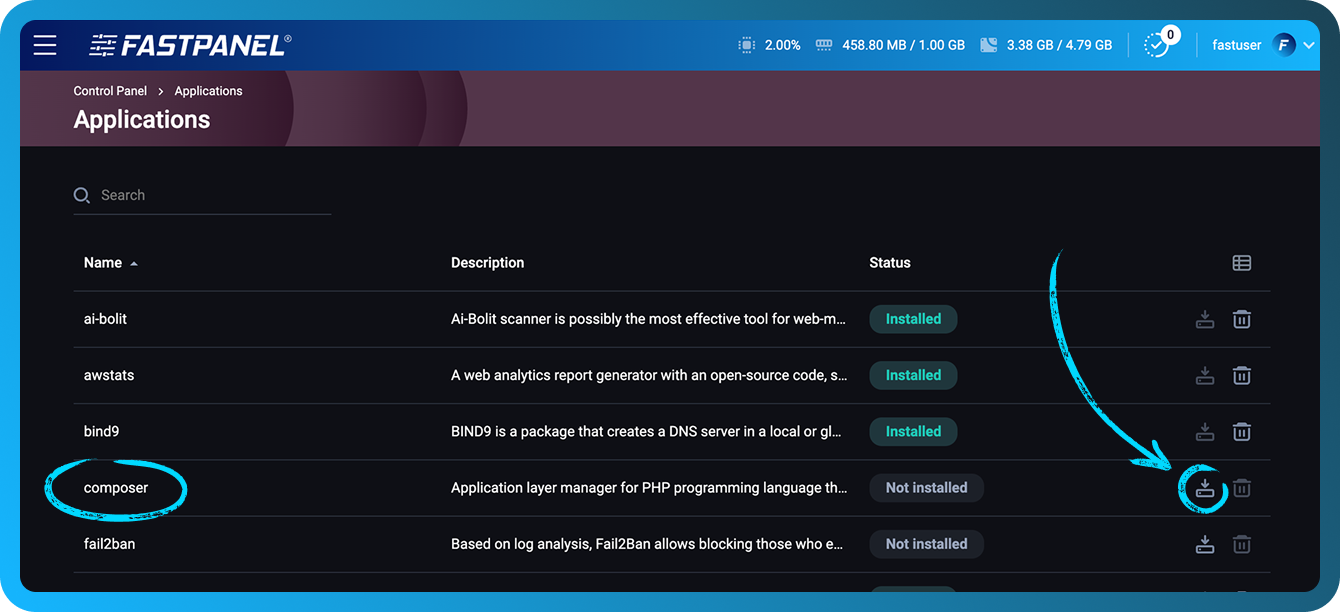
- Find Composer in the list and click the install icon on the right.
- Wait until the application status changes to “Installed”.
Creating a website
- Create a website for your domain as usual — the process is described in detail in Hosting a Website in Fastpanel.
- Open the site card, go to Settings and select Site directory.
- Enter public in the Subdirectory field and click Save.
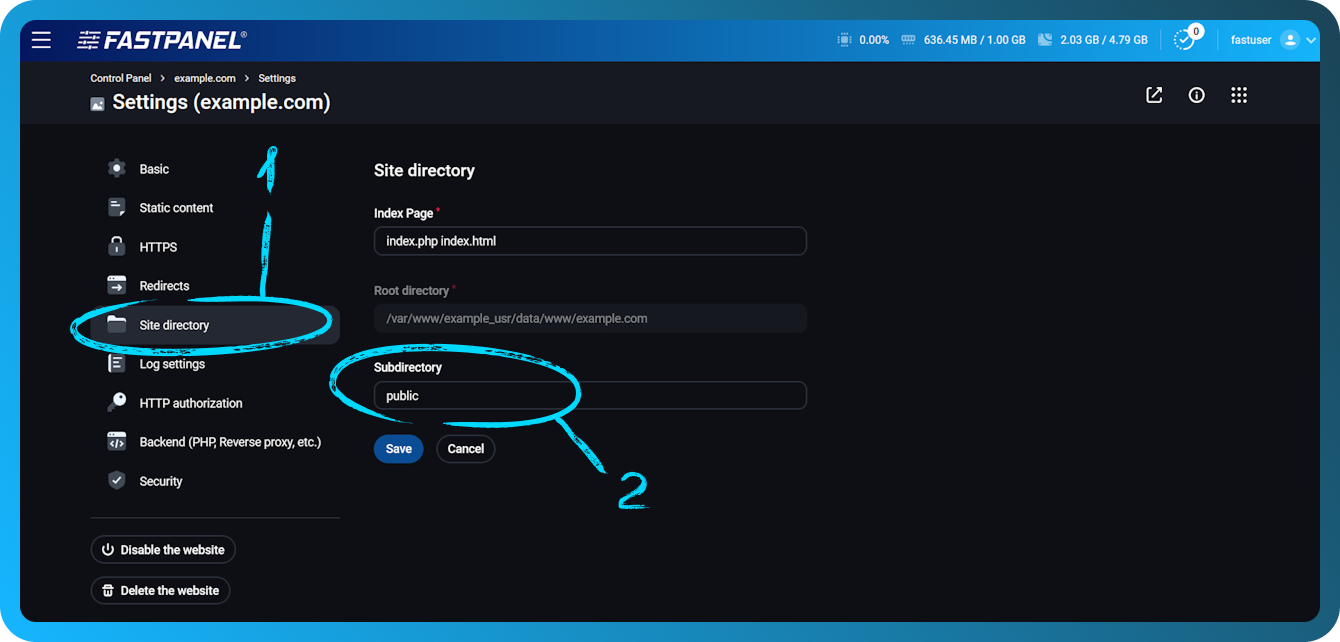
This step matters: in Laravel, only the public folder should be exposed to the web. The rest of the project — configuration, the .env file with passwords, source code — stays inaccessible from the browser.
Also check which PHP version is selected for the site. Current Laravel versions require PHP 8.2 or higher — you can change the version in the site settings, in the PHP section.
Creating a project
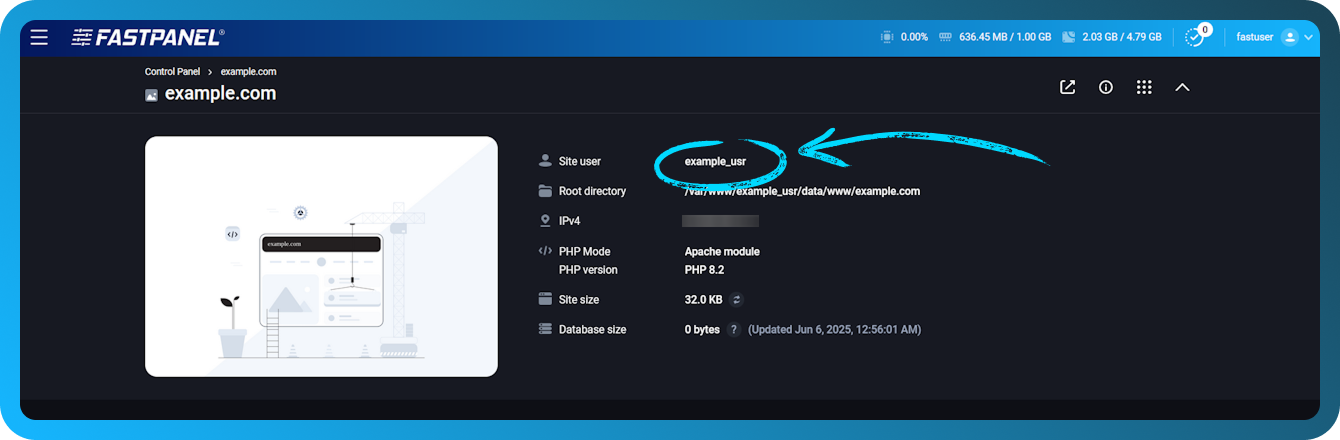
All commands are run over SSH as the site owner, not as root. The owner's name is shown in the site card in Fastpanel. If you are connecting for the first time, see Access via FTP and SFTP — SSH uses the same credentials.
- Go to the site directory:
cd /var/www/user/data/www/example.com - Composer only creates a project in an empty folder. Check what it contains, including hidden files:
If there is a default panel placeholder or other unneeded files, delete them. Double-check the path — this command permanently removes the directory contents:ls -lacd /var/www/user/data/www/example.com && rm -rf ./* - Create the project in the current folder (the dot at the end means “here”):
composer create-project laravel/laravel .
Installation takes from one to several minutes. When the message about the generated application key (Application key set successfully) appears at the end, the project is ready — open your domain in a browser and you should see the Laravel welcome page.
Installing a specific Laravel version
If your project needs a particular framework version, specify it in quotes after the path:
composer create-project laravel/laravel . "10.*"Keep in mind that each Laravel version has its own PHP requirements: older releases may not run on a recent PHP version, and vice versa.
Connecting a database
- Create a database and a user in the site card, in the Databases section. Note the database name, username and password.
- Open the
.envenvironment file in the project root, for example in the nano editor:nano .env - Find the block of
DB_parameters and enter your data. If the lines are commented out with#, remove it:DB_CONNECTION=mysql DB_HOST=127.0.0.1 DB_PORT=3306 DB_DATABASE=database_name DB_USERNAME=database_user DB_PASSWORD=user_password - Save the file with Ctrl+O and Enter, then exit the editor with Ctrl+X.
- Create the database tables by running migrations:
php artisan migrate
You usually don't need to edit config/database.php: it reads its values from .env. We don't recommend storing passwords directly in configuration files — .env is not committed to the repository and is not served by the web server.
If the application keeps using old parameters after you change .env, clear the configuration cache:
php artisan config:clearConnecting Memcached (optional)
Memcached stores cache in RAM and helps speed up a busy application. To use it, you need two things: the Memcached service itself and the PHP extension for the PHP version your site runs on.
Installing the PHP extension
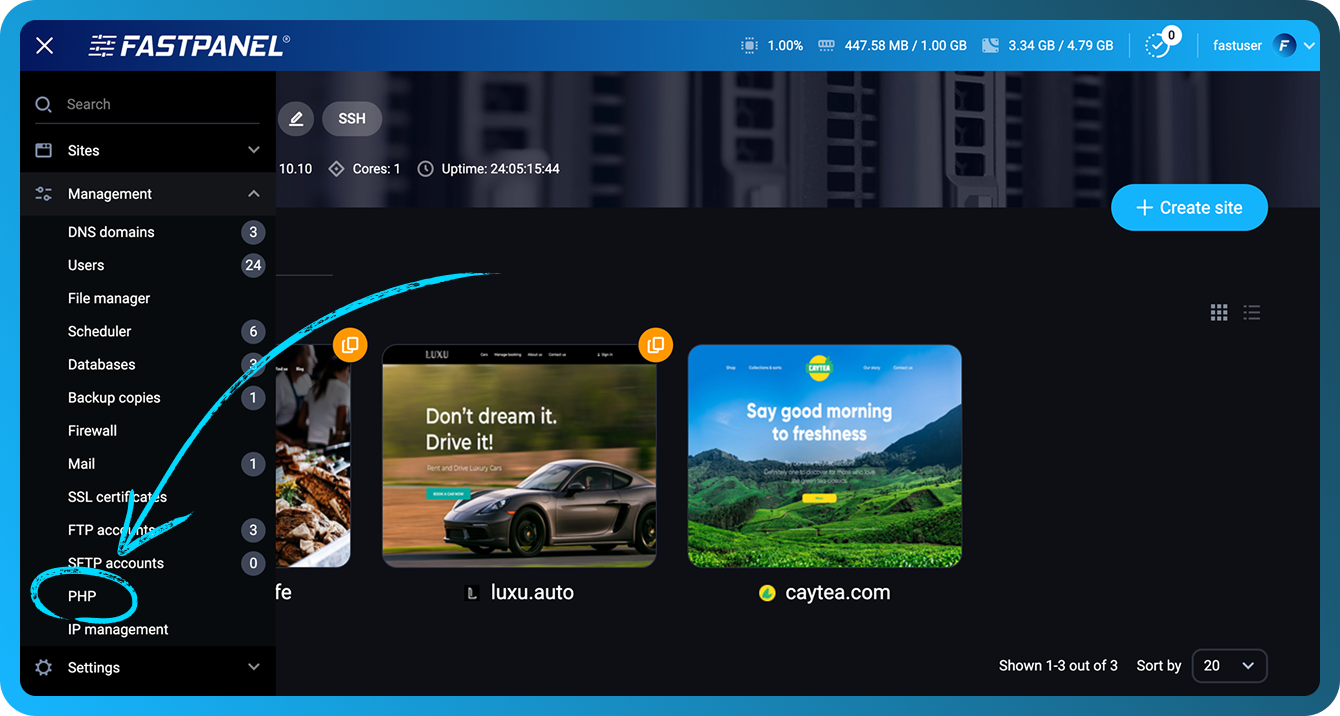
- In the Fastpanel side menu, open Management → PHP.
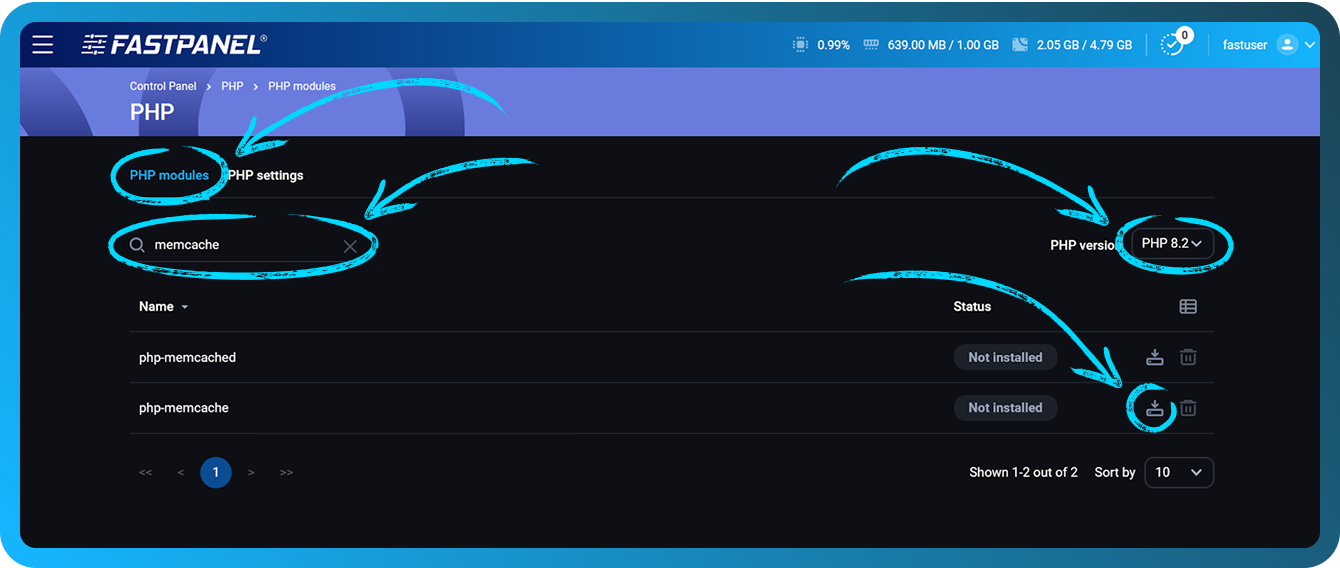
- On the PHP modules tab, select the PHP version used by the site on the right.
- Type memcache in the search field and click the install icon next to the php-memcached module.
Installing the Memcached service
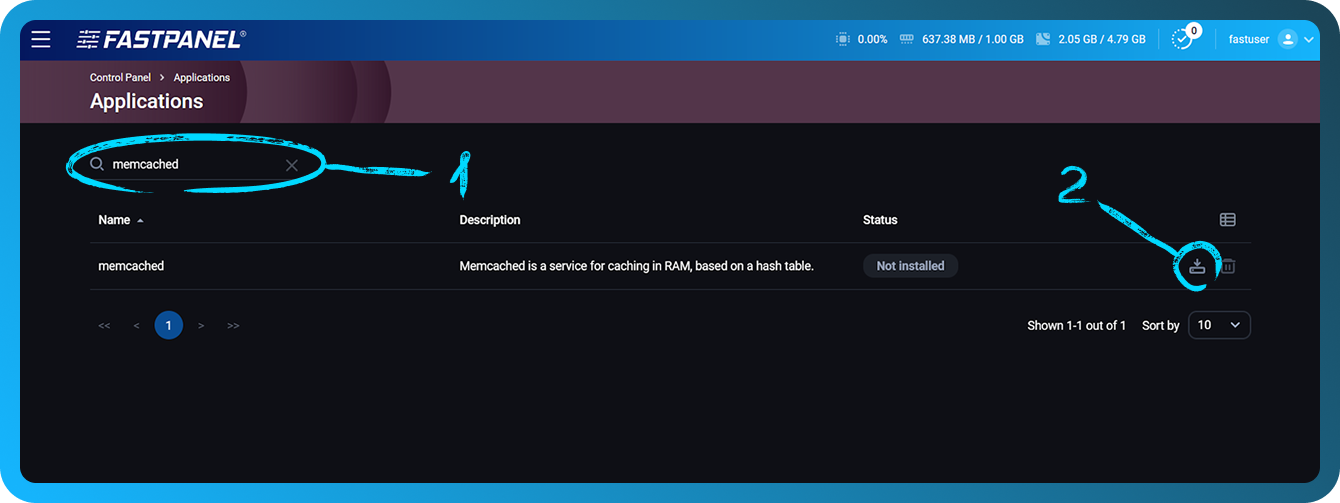
- Go to Settings → Applications — the same way as when installing Composer.
- Find Memcached in the list and click the install icon.
Configuring Laravel
The Memcached connection parameters are described in config/cache.php, and their values are also taken from .env. Add or change the following lines in .env:
CACHE_STORE=memcached
MEMCACHED_HOST=127.0.0.1
MEMCACHED_PORT=11211
In Laravel 10 and earlier, use the CACHE_DRIVER variable instead of CACHE_STORE. After making changes, run php artisan config:clear.
Running Artisan with a different PHP version
The php command in the console calls the system PHP version, which may differ from the one selected for the site. Because of this, Artisan or Composer sometimes report an incompatible version. In that case, specify the full path to the required interpreter. Alternative PHP versions in Fastpanel are located in directories like /opt/phpXX. For example, for PHP 8.3:
/opt/php83/bin/php artisan listComposer can be run the same way:
/opt/php83/bin/php $(which composer) installUseful Artisan commands
Run the commands from the project root folder:
cd /var/www/user/data/www/example.com- List all available commands:
php artisan list - Run database migrations:
php artisan migrate - Cache configuration, routes and views for a production site:
php artisan optimize - Clear all application caches:
php artisan optimize:clear - Put the site into maintenance mode (visitors will see a maintenance page):
Thephp artisan down--redirect=/pathoption redirects visitors to the specified page. - Bring the site out of maintenance mode:
php artisan up
The php artisan serve command starts a built-in server for local development — you don't need it on a Fastpanel server, as the site is served by the panel's web server.
If something goes wrong during installation, create a ticket in your client area — our support team will help you sort it out.

