

Configuring a Static IP Address
If your server periodically becomes unreachable for no apparent reason and without any errors in the logs, the problem may be that the server "loses" its IP address. When a server is created, it is assigned a dynamic address with a set "lease time". Before this lease expires, the server must request a new address (DHCP will automatically provide the same IP). However, some Linux distributions request the address slightly too late (after the lease has already expired), and the address is temporarily lost. This problem most often occurs on servers running CentOS.
To fix this problem, you need to configure a static IP on the server.
CentOS
The settings are made in the /etc/sysconfig/network-scripts/ifcfg-eth0 configuration file.
1. Open the file in a text editor:
nano /etc/sysconfig/network-scripts/ifcfg-eth02.1. Change the value of the BOOTPROTO parameter from dhcp to static:
BOOTPROTO=static2.2. Also add the following lines:
IPADDR=%SERVER_IP%
NETMASK=255.255.255.0
GATEWAY=%FIRST_3_OCTETS_OF_IP.1%
Example configuration for the address 188.225.78.45:
NAME="eth0"
ONBOOT=yes
NETBOOT=yes
IPV6INIT=yes
BOOTPROTO=static
TYPE=Ethernet
DEFROUTE=yes
IPV4_FAILURE_FATAL=no
IPV6_AUTOCONF=yes
IPV6_DEFROUTE=yes
IPV6_FAILURE_FATAL=no
PEERDNS=yes
PEERROUTES=yes
IPV6_PEERDNS=yes
IPV6_PEERROUTES=yes
IPADDR=188.225.78.45
NETMASK=255.255.255.0
GATEWAY=188.225.78.1
Save the changes.
3. Restart the service with the following command:
service network restart4. Check the result with the command:
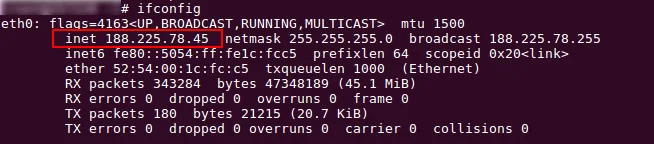
ifconfigIn the command output, the eth0 inet block should show the IP address you configured:
5. Make sure that at least one DNS server is listed in the resolv.conf file. Open the file:
nano /etc/resolv.confMost likely, the file already contains the entry:
nameserver 8.8.8.8If there is no such entry, add it to the file and save the changes.
BitrixVM
- In the Bitrix menu, select: 2. Manage localhost -> 3. Configure network interface manually.
- Specify the following parameters:
- Enter you choise interface: eth0
- Type IP address: %SERVER_IP% (for example: 188.225.78.45)
- Type broadcast: %FIRST_3_OCTETS_OF_IP.255% (for example: 188.225.78.255)
- Type network mask: 255.255.255.0
- Type default gateway: %FIRST_3_OCTETS_OF_IP.1% (for example: 188.225.78.1)
- Would you like to configure DNS server: y
- Enter DNS server addresses: 8.8.8.8 8.8.4.4
- Save change: y
- Check the result with the following command:
ifconfigMake sure that the eth0 inet block in the command output shows the IP address you configured.
Debian / Ubuntu 14, 16
The settings are made in the /etc/network/interfaces configuration file.
1. Open the file in a text editor:
nano /etc/network/interfaces2. Find the "The primary network interface" block and specify the following parameters in it, replacing the previous values:
auto eth0
iface eth0 inet static
address %SERVER_IP%
netmask 255.255.255.0
gateway %FIRST_3_OCTETS_OF_IP.1%
Example configuration for the address 188.225.78.45:
# The primary network interface
auto eth0
iface eth0 inet static
address 188.225.78.45
netmask 255.255.255.0
gateway 188.225.78.1
Save the changes.
3. Restart the service with the following command:
service networking restart4. Check the result with the command:
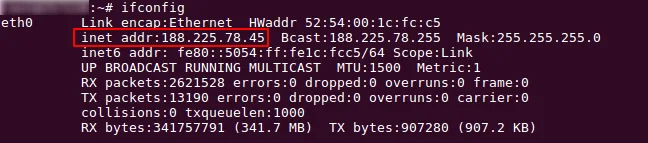
ifconfigMake sure that the eth0 inet block in the command output shows the IP address you configured:
5. Check that at least one DNS server is listed in the resolv.conf file. Open the file:
nano /etc/resolv.confMost likely, the file already contains the entry:
nameserver 8.8.8.8If there is no such entry, add it to the file and save the changes:
nameserver 8.8.8.8Ubuntu 18.04, 20.04
In Ubuntu 18.04 and 20.04, network settings are configured in the /etc/netplan/01-netcfg.yaml file.
1. Open this file in a text editor:
nano /etc/netplan/01-netcfg.yaml2. Make the following changes to the file, replacing the previous settings:
network:
  version: 2
  renderer: networkd
  ethernets:
     eth0:
        dhcp4: no
        addresses: [%SERVER_IP%/24]
        gateway4: %FIRST_3_OCTETS_OF_IP.1%
        nameservers:
           addresses: [8.8.8.8, 8.8.4.4]
Please note: it is important to preserve the hierarchical structure of the file. Each new level of directives must be indented with two spaces (do not use Tab indentation).
Here is an example configuration for the IP address 188.225.78.45:
network:
  version: 2
  renderer: networkd
  ethernets:
     eth0:
        dhcp4: no
        addresses: [188.225.78.45/24]
        gateway4: 188.225.78.1
        nameservers:
           addresses: [8.8.8.8, 8.8.4.4]
If you need to specify several IP addresses, you can do it in one of the following ways:
addresses: [188.225.78.45/24, "2a03:6f00:5:1::X:X/64"]or
addresses:
   - 188.225.78.45/24
   - 2a03:6f00:5:1::X:X/64
Save the changes.
3. To check the configuration, run the command:
netplan tryIf there are no errors in the configuration, the system will offer to apply the new settings. Just press Enter.
You can also apply the changes immediately with the following command:
netplan apply
